F I N E H Y D R O C A L C A S T I N G S
B Y C. C. C R O W
P. O. B O X 1 4 2 7
M U K I L T E O, W A 9 8 2 7 5
U S A
Crow's Home
 Home List Top
Next Clinic
Crow's How 2
Previous Clinic
Order Crow's
Contact CCC
Home List Top
Next Clinic
Crow's How 2
Previous Clinic
Order Crow's
Contact CCC
|
C. C. Crow's On Line Clinics |
|
AND OTHER MODELING TIPS - GENERAL TIPS and TRICKSHydrocal is great stuff. Not only can we cast all this great stuff but I actually build most of my patterns with it, either using cast stocks like my own brick, stone or concrete, or hand scribing and carving all new originals in fresh Hydrocal. So what's the trick? Hydrocal is supposed to be strong rock hard stuff! Well, yeah, it is. But when it is freshly poured it is in a semi-hard state that is idea for scribing and cutting. And when cured, it can be softened with just a few drops of tap water and easily carved with repeated strokes of your hobby knife. PURE WHITE HYDROCAL I use White Hydrocal from US Gypsum for my patterns and casting. Plain Grey Hydrocal would be the same. Avoid Woodland Scenics Lightweight Hydrocal! That's fine for scenery but the lightweight additive screws it up for what we are doing. Ultracal, Plaster of Paris and the dozens of other plasters and gypsum cements all have their advantages and disadvantages. Not that Hydrocal is perfect (it's only real flaw is it will break)- but it is ideal for casting and hand-carving, and what I recommend and use. With that overview, let's look at the basics. 
CUTTING HYDROCALLike I said above, the trick is simple, you can soften the Hydrocal with a few drops of tap water, applied locally. Then use repeated strokes with your hobby knife (No.11 blade) to cut out an opening or a new edge. 
To keep your cut straight cut along a metal straight-edge such as a scale ruler or small machinist's square. Use repeated strokes. The first should be held true, perpendicular to the surface. Angle the next stroke, so as to widen to cut. Repeat back and forth between true and angled cuts. Add more drops of water as needed. 
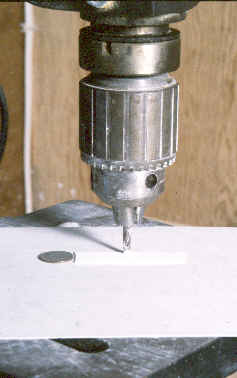
You can use freehand strokes to remove excess plaster from the middle of an opening. When cutting out an opening for a new window or door I will leave a retaining lip along the edge at a certain depth. You might notice these as hand-carved in my earlier work or as (wooden or plastic) inserts in my later work. No matter the material used in the pattern it will become cast Hydrocal after the molding and casting process. You might wonder why I leave in those dumb sections behind the window openings that you have to cut out. There are two reasons for this. One, if I brought the cuts all the way through then in the casting process I like to scrape the backs of my production castings flat and this would cause some interference with that. Secondly, a little extra plaster strengthens the castings during wrapping and shipment to you. But back to cutting. If you are cutting the edge of castings in a straight line you don't really have to cut all the way through. You can score it, sort of like styrene, and snap it. When I do this I like to back score it as well to keep the break just where I want it. On thicker pieces or when I am in a hurry I'll use my band saw to cut through the piece quickly. Before I had the band saw I even resorted to using my table saw however I do not recommend this! Cutting Hydrocal is definitely tough on your saw blades and it kicks up a lot of white dust! And I mean a lot. I bought a small 9" Delta band saw to use exclusively for my Hydrocal cutting that I've attached my shop-vac to.
DRESSING YOUR CUTSAfter rough cutting I true up the edge with a large flat Bastard file. I have nailed my file down onto the edge of my workbench with brads so both my hands are free to hold the work. I employ blocks of wood to hold the work square or to precise angles that the blocks are cut to. Holding the work to the blocks as I draw them across the file transfers the angle precisely. 
Filing is best done dry. Wet and especially fresh Hydrocal will attach and almost instantly rust your good iron tools. Be sure to keep them clean. They load up fast and a small wire brush is a necessity. One of the really outstanding properties of Hydrocal modeling is it is three-dimensional. Once we cut an edge we can take a little extra time to scribe the brick or stone mortar lines around the corner. This is really difficult to do in plastic or embossed brick but not so tough here. And we will be rewarded with an outstanding model. It is really quite simple. After cutting and truing, we soften it up with a few more drops of water and scribe away. For window and door openings I just use free-hand strokes. For wall edges it is a little more involved. You need more control so I will use little squares to guide my work. My scribing tool is actually two pin vises, one small one mounted in a larger one, that are very comfortable to hold for long hours. The point is just a steel needlepoint I picked up somewhere. It's about 3/32" round. If you are doing just a little work you might be able to get away with using your hobby knife or maybe a cheap scribing tool. Just take your time and be determined to do a good job. Remember though, you cannot erase! 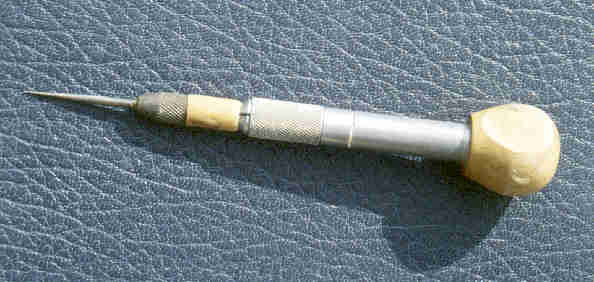
ASSEMBLY TECHNIQUESHydrocal is really most like wood. It is a porous material so just about anything that works well with wood will work well with Hydrocal. I'll go ahead and repeat what I said in the fixing broken castings clinic. First off, check to see that the castings will fit together properly. If we start off with a good square joint we will end up with one. If we start with a poor one that's not square, rounded because we sanded it, or didn't bother to check we'll only end up frustrated with a poor joint. I've done my part as best I can. I even dress many of my castings before they are packed to assure you of the best results. It is up to you to be sure it all works out. Work on a firm flat surface. My workbench is 3/4" sanded plywood. If it were less it might sage or bend and transfer that onto my work. We don't want that. I've seen some good modeler's wonder why a casting broke when they trued to cut them on a card table! Duh. Okay, enough said, let's give it a try.
Apply a small bead of glue along one side of the joint. Then quickly push the two sides together. Apply firm pressure. Be sure they are square and aligned just how you want them. In just a moment the glue will begin to firm up as the moisture is absorbed into the plaster. For that reason we must work quickly. You don't get a second chance. Use good fresh glue. If it is contaminated with a speck of dried glue or anything else you will not get a good clean join. If you have used the correct amount of glue but a few tiny bubbles might ooze out. We can pick them off in a moment. Be careful, we don't want to rub excess glue into the raw plaster as it will tend to seal it. This is of little consequences if we are going to seal the castings later on anyway however if we plan to stain them it could be a major problem. Note that usually I am assembling my models after I have painted them. After holding the pieces together initially we can now relax and leave them alone while the glue sets. Really, it only takes about fifteen minutes before we are able to gently handle the piece again. In a few hours the you will have a permanent bond. 
Sometimes I do not completely assemble my models with glue, that is, glue them all together. Perhaps I'll glue certain assemblies or sections but then just friction fit or pin them together. This allows for disassembly for storage and possible shipment (I haul a lot of them around to train shows) or maybe for the installation of interior details and/or lighting. To pin a model together I'll use small pins cut for .020" or 1/32" brass rod. To properly align the pins with the respective holes I first drill and insert a short marker pin, that is on which is cut very near the surface so the pieces can be held together and when aligned just right wiggled together so the marker pin scratches in the proper location on which to drill the other hole. Since these are very small drills I do it by hand with a pin vise which does take a lot of time. You drill a little and have to clean the drill groves- but you do get a good fit. Replace the marker pin with a longer one and mate the pieces together. Sometimes it helps to bend the wires just a bit to spring them for a better grip. 
Each model is different. Obviously, the smaller models don't need pins but they work well on the roundhouse and engine house. I use pins to hold the walls upright too. A couple for each wall. I'll use pins and small brass clips to hold them together and attach other elements such as trusses and roofs. Below is a link to the next clinic or you can jump back to the list.
|