F I N E H Y D R O C A L C A S T I N G S
B Y C. C. C R O W
P. O. B O X 1 4 2 7
M U K I L T E O, W A 9 8 2 7 5
U S A
Crow's Home
 Home List Top
Next Clinic
Crow's How 2
Previous Clinic
Order Crow's
Contact CCC
Home List Top
Next Clinic
Crow's How 2
Previous Clinic
Order Crow's
Contact CCC
|
C. C. Crow's On Line Clinics |
|
AND OTHER MODELING TIPS -
AND WHITE METAL -
I will be loading photos to support this work at a later date. 1. THE ART OF BRASSI'm not just satisfied knowing a that a model is built, I want to know how it was built. Sticks of basswood or styrene into a building, even cast plaster into masonry are not that hard to figure out. I can do that. But how about a brass model? Sure, we can figure out brass is punched, bent and etched, and cast with intricate detail. But how do they really do it? And can I do it? I thought a book titled: The Art of Brass, Volume 1, Presse Eisenbahn, 1982 certainly would have the answers. In reading the title list I made the mistake of thinking it would be an insight into the tools and techniques. Indeed, "The Art", of constructing brass models. Unfortunately it was merely a catalog, a very nice pictorial catalog, of Kumata & Company Limited (KTM) models. It had no insight into how it was done. From time to time there have been visits to various manufacturers published showing glimpses of how these things are done. But there has been no definitive work (not that this is going to be one). I had to feed my thirst for this knowledge in bits and pieces spread out over many years. Besides just the pleasure of learning about, art appreciation if you will, another major reason for myself, as a structure kit manufacturer, was to add such capabilities to support my work. Many projects had to be passed over because the right door or window was not available or the ones that were, were too much of a compromise. If I were just building a single model for myself I would probably manage to scratch-build needed items, but if you are planning on producing a hundred kits or so some sort of reproduction is called for. You can, and I have, gone outside to Grandt Line Products and others, and pay a few big bucks to have them done in injection molded styrene. But for the small runs C. C. Crow is doing something "in house" was more desirable. More fun. My friend, Glenn Farley, who you may recognize as an award winning brass locomotive model builder put it these terms, with the cost of brass locomotive these days, instead of buying one or two of the latest and greatest, you can buy a miniature lathe, a mill, and the casting equipment to make your own. Indeed, Glenn has proved his theory. His little 0-6-0 L&N steam switcher took Best in Show at the 2000 NMRA National Convention. Glenn's four part construction article has just concluded (Sept. 2001) in Mainline Modeler. So how'd he do that? Well, I'm going to tell you. At least about the casting equipment. My search began, as I said, with this book, The Art of Brass. I bought it blind off a book list. I think it was forty-five bucks which was a lot of money in 1982. Perplexed, my desire to know more about this mysterious art lay dormant for several years. I began writing modeling articles and offering kits. The kits relied on available parts. As my reputation grew I was able to approach, or I was approached by other manufacturers offering their help. Russ Simpson was one such person. Out of the blue one day a letter arrived offering me his manufacturing services. 2. SIMPSON PRODUCTSRuss Simpson is an interesting fellow. He lives up in gold country, on a ranch in Placerville, California. He manufactures all sorts of stuff, from turnouts and ties, to injection molded pieces. When his letter arrived I was considering the NP 90 ft. Roundhouse. The engine doors and windows were the hold up. So we arranged a deal, incredibly, Russ would add them to his catalog. The windows appeared quickly but the engine doors did not. I waited and waited. Russ often works in the movie industry. Remember that movie? Oh, what was it? Star Wars. Yeah, that's it. Russ was the guy who did all those great models. Lucas Films became huge because of that film. They only talk to big companies now days, for model bids, with one exception. Russ Simpson. He's still invited to participate. So every once in a while Russ disappears from the model railroad scene because he is working on a movie project. Apparently that's what happened in this case. I guess we can excuse him. He has light sabers, the original mock-ups! Russ has some old-fashioned injection molding machines to support his work. They are no longer manufactured because they are not automatic and require the operator to reach in and eject the molding each time one is made. Not only is this time consuming but it is dangerous too. OSHA would never approve. Old machines are grandfathered so they can keep running in small shops such as Russ's. When he has time. Russ is busy with all sorts of stuff. His shop was very interesting. A variety of buildings out behind his house with injection molding, white metal, wood cutting... 3. JACK PARKER'S CENTRAL VALLEYWord got around that my roundhouse project had stalled, in need of doors. That's when Jack Parker got involved. Jack's another interesting character. Jack's background includes some mechanical engineering for Ravell. For instance their famous brick engine house, which Al Armatage later modified into the Bakery and Theater. Jack actually designed the original engine house. On one of my visits I noticed the original mock-up sitting on one of his shelves. It's made of cardboard! How much more original can you get than that? Yet, Al Armatage seems to get all the credit, not that he doesn't deserve some of it. How many model railroaders know it was Jack's model? In Jack's words, he did the corporate thing, worked for a big company raising kids in suburban LA. One day he got fed up with it and noticed Central Valley Model Works was up for sale. It was well know for producing freight and passenger car trucks. They were the top of the line for the time and are still sought after today. The owner's widow wanted the business to stay in southern California. Jack agreed and bought the company. Jack explains this upset some mid-western concerns who had their eye on the company. It seems they wanted to move it to the mid-west and market it under their name. One of their friends happened to be in a position to publish an unfavorable report about the products. Some of the secrets of manufacturing quality trucks had been lost with the original owner's death. Specifically, how to apply the lacquer insulted wheels to the axle and keep them properly gauged. Jack knew he had problems. He fixed it by going to plastic insulation and he developed a unique rolling test that eliminated the mistakes. Even though he informed the publisher of this they refused to acknowledge those efforts and ran the negative review anyway. This had a great impact on our hobby. Jack was practically run out of business overnight. He went from being swamped with back orders to finding cobwebs in his mailbox. The shame is these great products were removed from our shelves, not because they were bad, but because of petty greed. The machines still sit idle in the back of Jack's shop. He refuses to restart them. We can't blame him. Jack managed to survive by pulling a rabbit out of his hat. The magic trick was the release of his first injection-molded kit, his Through Pratt Bridge. There had never been anything like it before. A beautifully rendered scale model at a reasonable price. It could not be ignored. It's an interesting story how it came about. Jack wasn't a machinist, he was an engineer. He had a machinist friend who was going to do the pattern work. Jack had put the shop together, the injection molder, lathe, mill, pantograph and all the supporting equipment you need to run the molding machine. His partner's job was to cut the patterns but all he wanted to do was sit around and think about it. Jack kept encouraging this guy to get started but nothing happened. He had to "think about it". So finally one day, actually over a weekend, Jack decided he would fool around a bit. The first thing he cut was a bunch of fences. Yes, the same ones that he sales. By the time his buddy showed up again Jack had his toolbox waiting for him at the front door. He wasn't needed anymore. Shortly Jack had his bridge in full production and it was very successful. You might be wondering what this bedtime story has to do with investment casting and white metal. You're right, not much, except it was all a part of my search for those answers. At one point I was considering getting into injection molding myself. But visits to Jack Parker, Russ Simpson and Dave Grandt convinced me otherwise. The largest obstacles are the purchase of the equipment. It is a major investment. This is just a sideline to what I wanted to do, manufacture my structure kits. I didn't want to spend all my time making doors and windows and all the other things I would need to do to pay for this equipment. I decided I would wisely leave that to the experts and concentrate on what I do: Hydrocal castings and structure kits. So anyway, my roundhouse project had stalled. Jack happens to be a Northern Pacific modeler. You've probably seen pictures of his wonderful layout which shares the basement of his living/business complex. Jack really wanted a brick roundhouse for his layout. So what's the delay? Russ was busy and couldn't get to it so I worked out a deal with Jack. I agreed that if he did them I would build the model for display on his layout. I think a good deal for everyone. Where better to advertise my roundhouse than on one of the premiere layouts in the country. Jack commented that cutting the engine doors was no big deal. He'd do them anyway, if he were scratch-building the model, he's cut a mold rather than build six pairs form scratch! Yes, it is nice to have the tool available. So the engine doors arrived and along with the Simpson windows the roundhouse kit came into being. Subsequently, the windows have been replaced by Grandt Line, when Russ was unable to fill an order. I need to replace the clerestory windows for the same reason. But what do you want "for free"? 4. GRANDT LINE PRODUCTSI should briefly describe an injection molder. No, I'm not an expert, but I have been exposed to them through my visits with Jack Parker, Russ Simpson, Dave Grandt and others. First, let's start with the pattern. You're all familiar with the product, be it a small part or a larger locomotive shell. Basically, you have a metal mold. It can be two parts or more. These molds are clamped together. Plastic pellets (rejects and scraps can be ground up and added back) are funneled into a heating element. The fluid plastic, usually by means of a screw, is forced under pressure into the cavity. There it cools and solidifies creating our parts. The more sophisticated machines have cooling elements to control the cooling and springs and pins automatically eject the parts. Timing and temperature are carefully controlled. The traditional way of cutting molds employs milling out the cavities. A pantograph may be employed. It is a precise milling machine that copies a larger pattern. The larger pattern is more easily made and can be constructed in plastic for instance. Of course there is a real art form to all this. These days computers do the work with fancy programs and expensive machines. We cannot complain about the work, A Proto 2000 locomotive or an Intermountain freight car are beautiful indeed. Or hobby has come a long way from cardboard and wire. On a field trip to California I visited Grandt Line Products. I wish I had brought my camera along because forever I will have the perfect image of Cliff Grandt burned into my memory busy at work in his small cluttered shop, projects, parts and tools all around him, magnifying loop attached to his glasses, fiddling with his latest tiny project. Something I want to do when I'm ninety years young. Cliff's son Dave graciously showed us around the busy Grandt Line shop. They were in the process of setting up a new CNC machine to replace the old fashion mills and pantographs. I should mention that it is not just a single machine to do all these things at the press of a button. A complete machine shop with drill, lathe, milling machine, grinders and the skills to run them that makes this possible. 5. WHITE METAL FEVER - FSMOkay, injection molding is certainly beyond what any model builder or small time manufacturer like me is going to set up in his basement. But brass casting or white metal might still be within reach. So let's take a look at these. I've always been attracted to white metal. I remember going home one day from the hobby shop with my brother Phil. We swore each other to secrecy about how much money we had spent. He had spent $17.95 plus tax and I, $21.95 plus, on some of these Fine Scale Miniature kits we had just discovered for the first time. He bought The Coal Bunker and I bought The Depot. At list price, in a hobby shop! Ah, those were the days. Our parents would kill us if they knew how much we had spent. I just couldn't resist that box of tiny pieces and "super detail" parts FSM is so famous for. Just the weight of them made me part with my hard earned cash. I was fifteen or so. In the back of my mind I've always thought it would be great to be able to create my own white metal castings. As I established my structure kit business that desire became louder and louder, and more practical. Finally, I seriously started wanting to know more about it. I even wrote a letter to George Sellios of Fine Scale Miniatures to see if he would provide me with any clues. George, probably more wisely than I, declined to comment, not wanting to help out the competition. Perhaps this is wise as I have been personally thanked for helping inspire a certain manufacturer of Hydrocal kits. Foolish or not, I take this noble route in the hope that it improves our hobby. It's not rocket science. The information is out there. It just takes time to dig it up. It still takes, I hope, a bit of artistry and talent to put it to successful use. The bottom line is I'm still near broke whether I blab or not. 6. BUILDERS IN SCALESo, where to look next? How about Colorado? I could go off on a long sidebar about my friend Rooti who I grew up with in Connecticut who now lives in Colorado working as an engineer for Ball Aerospace (yea, sort of a rocket scientist) who I go on my almost yearly motorcycle tours with- but that would be a completely different subject. Instead, I'll just explain that visits to Rooti offered a platform to befriend other Coloradans such as Jim and Jan Haggard of Builders In Scale. Yes, another well know expert in the field of structure kit manufacturers with a certain talent for white metal details. I first meant them at one of the Narrow Gauge conventions. Subsequently, we've become friends. They are great people. Even if they root for the Broncos. Anyway, Jim invited me in to see their operation and he was very open with his explanation of the white metal process. You start with a metal pattern of what you want to reproduce. It must be metal because it has to withstand a lot of pressure, maybe 2000 psi, and 350°:F for about two hours. So plastic is out. White metal is spin cast in a centrifugal machine in black organic rubber molds. The rubber molds are vulcanized or hardened under such heat and pressure. A special machine with heating elements and a hydraulic jack press do this. Your patterns are placed in a circle on top of a raw rubber disc. Special metal cones are placed around the outer edge and will help align the mold halves later on. A spoke wheel or gate former pattern is placed in the center. This will distribute the molten metal equally into the patterns during casting. Another raw rubber disc is then placed on top. Both discs are treated with talc to help prevent them from sticking to one another and the patterns. The disc are placed on top a steel plate which has a matching steel ring. The mold frame is complete with the addition of a matching lid. It is then ready to place in the volconizer. The pressure is pumped up and in about two hours the job is complete. The rubber mold is removed from the frame and the struggle begins. I knew I should have used more talc! It is a bit of a wrestling match, screwdrivers and crowbars are employed to peal the halves apart and remove the masters. Actually, if you use enough talc or silicone mold release they'll come right apart. With that done we have to cut gates and vents into the rubber to allow paths for the white metal to flow into the cavities and the air to escape. There is a certain art to this. As is the subsequent casting. I'm still learning these mysteries. They are that too. Some things work without trying while others, for no apparent reason are buggers. Larger bulkier items are usually trouble free while smaller items like a window with thin mullions can be quite difficult. I swear (a lot!), sometimes even the weather effects the process. One good thing, all your white metal scraps can go back into the melting pot. But is can be frustrating spinning and spinning and only getting a few to come out each time. 7. THE PLAN - WHITE METALConvinced I wanted to do white metal I looked into purchasing the equipment. Tekcast Industries in New Rochelle, NY and no doubt others will sell it to you, a complete set up will only cost you about ten thousand dollars. Gee, that's a lot of kits! One day I noticed an ad in the Seattle paper, someone was selling their white metal casting equipment. I called to check it out. As a result I bought a small English-made casting machine second hand, including a melting pot for under one thousand dollars. The set up was still shy of the vulcanizing machine, another two grand, though through another model railroading friend I have access to. 8. CHOOCH ENTERPRISESChooch Enterprises products have been around for a long time. Mike O'Connell, the owner, started off working for Disney. On the side he developed his model railroad products which not only included the urethane castings and loads he is well known for today, but he also manufactured some excellent detail castings and kits, both for structures and rolling stock. Berkshire Valley now manufactures many of Mike's detail parts. Mike employed an artist to create many of his masters. One Christmas Mike's artist asked if it would be okay to make a small structure caricature and reproduce it as gifts for his friends and relatives. Mike said sure, why not. It turned out so well that they developed this into a multi-million dollar business employing several dozen full time workers and hundreds of per part artisans under the brand name Michael's Miniatures. Mike finally sold the business a few years ago. As he explained, he was running a business and not making railroad models as he wanted to be. In semi-retirement now he has retooled the Chooch line and is working on other model railroading endeavors including his Proto:48 dream layout of downtown Tacoma. Mike still has all of his manufacturing equipment available to support his hobby. Thought not all of it is set up because of his move to the country, it includes white metal, urethane, injection molding and lost wax. Mike agreed to leave me use his volconizer for my limited needs. In return I offered some of my patterns. My original goal wasn't to get into full production anyway. All I really wanted to do was fool around a bit and be able to do my own small runs. My 9" casting machine would economically fulfill these needs. The molds are clamped together with four nuts which must be removed and returned for each cycle so it is slow and tedious. Any long runs and I'll want to go outside for production. Production equipment employs compressed air to clamp the molds together. Half a day of doing it by hand really wears you out. What is white metal anyway? Well, white metal is a broad term for many low melting temperature casting alloys. We are most familiar with the lead based alloys, which have been much used in our hobby. They were widely used in type setting for the printing industry and are well suited for our miniature needs. A typical Lead based alloy combines 10-40% tin, 3% antimony and the balance lead. Tin based alloys add smaller amounts of lead and antimony to tin. Zinc and copper based alloys melt at higher temperatures and we'll discuss them later with our description of brass. The lead and tin alloys melt between 500-600°F. The ratio of the metals modify the alloys hardness, tensile strength, fluidity and temperature range. Your metal supplier can provide you with specific data. To avoid the possible health hazards of lead I mostly use a tin based alloy. Lead supposedly flows a little better but I don't need to know that. The tin generally works fine for what I am doing, small doors and windows. Belmont Metals, 330 Belmont Ave., Brooklyn, New York 11207 has a full line of these non-ferrous alloys to choose from. You may find a local distributor as I have in metropolitan areas. 9. PACIFIC FAST MAILFor white metal molds, because of the high temperatures and pressures of the vulcanizing process, your patterns need to be resilient and your best bet is metal. This brings us back around to examine the lost wax investment casting process. What better place to find this than Pacific Fast Mail. PFM of course is well known for their many years of importing fine brass models from the likes of Fujiyama, Tenshodo and United. Each month for what seemed like forever their ads covered the back page of Model Railroader. The question was always what are they going to tempt us with this month? A lot of the patterns for these fine models were done here in the States. In the later years you could purchase their parts from Precision Investment Associates, PIA. One day I managed to get myself invited over to get a look-see. It was an eye opener. I only had a vague idea of the process. Here, I was allowed to see it first hand and ask all the questions I could think of. Don Drew walked me through the process. It started off with patterns. While specifically how those were done wasn't directly answered indirectly I understood they could be done just about anyway you wanted them to be done. That is, the thing I learned was they were reproduced in RTV silicone rubber molds much like I was already using with my plaster castings so I understood at once that the patterns could be whatever you were most comfortable with. Styrene, wood, metal, plaster... it didn't matter. The new thing I learned was the duplicates were wax, heated in a pressure pot and injected into the mold. The molds were cut too, which was something new to me, having most always worked with flat molds. The pattern would be suspended on a gate, typically an eighth inch tube or so, which is placed in a frame, three quarters or an inch thick, one and a half to two inches wide and maybe three inches tall, depending upon the size and shape of your pattern. The gate tube is mounted on a nipple which is shaped like the wax injector's nozzle. Don explained that they were using Dow Corning's type J rubber which is harder than the 3110 type I'm used to. Being thicker it requires vacuum de-airing, something I had been getting away without doing. Anyway, once the mold has cured it is carefully cut apart. A sharp scalpel is used and the part line is wiggled so as to create a non-flat surface so when the mold halves are put back together they register and the part is aligned. An expert can do this so they align perfectly and no part line is seen on the part. On one particular part they were injecting the piece was hollow, made so by injecting around a brass rod, which was then pulled out and replaced in the mold for the next. To inject the wax the mold is held firmly together between two flat blocks. The nipple end is then pressed into the wax pot which releases the valve and allows the wax to flow in. With the right wax, temperature and pressure the mold will fill and almost instantly you will have an identical piece. Do that a bunch of times and you have enough for a tree. No, we aren't doing a scenery project. A tree refers to the shape of the built up wax patterns. The individual waxes are attached to a wax stem or trunk one at a time with a hot knife or tool. Typically, dental tools are heated over an open flame for this. Once the tree is complete the next step is to invest it. No, we aren't taking it to the bank. It is placed inside a stainless steel flask and investment plaster is poured in. This is a special plaster formulated with silica so it can withstand high temperatures. To be precise, 1350 degrees. The mixing ratio with water must be very precise and you only have a short time to work with it. To make sure there are absolutely no air bubbles it is vacuum de-aired twice, once in the mixing stage and again after pouring into the flask- so no smoke breaks. There are a bunch of other rules too. Some are explained with the investment plaster. A special wetting agent, a debubblizer, is used. The waxes must not touch the flask and should be kept back from the end, or top as you are pouring it, or you risk a blow out, which believe me, you don't want when you are talking about molten metal flying all over the place! Generally, all the limbs should be pointing upward so the metal can flow into them. As I mentioned earlier, there are two ways of casting, centrifugal and vacuum. The rules are much the same. With vacuum, the flask is perforated so the vacuum can take effect equally all around the piece. With centrifugal, the flask is a solid tube. The investment plaster, like everything it seems that has to do with jewelry making is expensive, like a dollar a pound, so you do not want to waste it. And no, you cannot reuse it. So you want to pack the waxes in and choose the proper size of flask. Okay, with that done, the next step is to burn out the wax. Actually, that would be very smelly and smoky so you heat the flasks up to about 250 degrees with them facing down (just like you poured them) over a wax collecting tray. At this temperature they begin to steam, melt the wax and it drips out. You won't get it all out but some. It's now time to pull the tray out and flip the flasks over. Slowly, you bring the temperature up and steam turns into smoke and you shut the door on your burnout oven completely for the final climb to temperature, 1350 degrees as I mentioned. Any higher and your investment plaster will start to break down. My little kiln doesn't have an automatic temperature control so I must tend it, usually over night, so it makes for an interesting weekend. It's exciting enough that I'm usually up for it but if I were doing it more than a couple of times per year I'd want a fancy control. After reaching temperature you want to bring it down to casting temperature, which can be different depending upon what metal you are casting. Higher for gold or platinum. We are using "Art Caster's Brass" and like to cast from 1100 to 900 degrees. We think the higher temperature works because we are novices and by the time we pour the metal it has probably dropped to 900°. PFM used and nice electro-melt. For five hundred dollars or more we decided to use a gas torch, a small acetylene outfit refitted with a "rosebud" nozzle and propane. It puts out an pretty nice flame that heats up the charcoal grill in a snap, but that's another story. Okay, things are getting exciting now. The flasks are in the kiln and at temperature. Did I mention that we want to carefully measure out the right amount of brass? Well, yeah, lets go back to when we had the wax trees. We want to weight them and multiply that by the specific weight of brass, about 7.2 and add a little for the button, or base of our tree. Now, somehow we have to keep track of which is which as we go along and keep our fingers crossed that we guess right. Are we having fun yet? Okay, back to work, we are heating up the brass in a pourable crucible with our big torch. You want to be careful because the fumes contain zinc, which is harmful. PFM had a big hood over their equipment and I work out in my garage at the door, with a big fan sucking away from me and it seems to work fine. And of course you want to be very careful with the torch. The first time I used it I suddenly realized that just about everything around me was flammable. So think about it a bit. You'll want gloves, goggles, sturdy clothes or maybe an apron. Lock up the cats and dogs unless you want a brass likeness of them. Kids are bad too. It takes a while to heat up the brass and you don't want to boil it. At the right temperature you can see it rolling. Okay, out comes the flask. It's either dropped into the vacuum chamber or placed in the centrifugal caster. For vacuuming, it's dropped in and the pump is turned on. A gauge shows if it is sucking and then you pour the molten brass in. If you have guessed right you have melted just enough to see it rise to the top with a bright orange button. With my centrifugal caster, the crucible is actually a part of the machine. The machine is spring loaded so you haven't forgotten to wind it up have you. No, okay. So the flask is brought over and placed in the cradle, it's slid together with the crucible and the moment of truth has arrived. It's released and with a flick, hopefully the right amount of metal is flung inside the cavities as it spins round and round. Now we have so more fun! After a moment or two the flasks are removed and dropped into a tub of water. This is exciting because they are still frying hot and a miniature explosion erupts. This is okay because it helps break the remaining investment plaster away from our new brass trees. PFM used a garden nozzle hooked up with air pressure to help blast away the plaster. After they have cooled down a bit we can reach in and hopefully examine some brand new detail parts. Occasionally we have screwed up and there is nothing there, a bad spin, no vacuum, a total or partial blow out, or maybe there are bubbles or cracks, or other flaws like bad brass (maybe it was too hot, too cold, too much flux). But hopefully, we have done everything right and are delighted by what we have done. But wait, we aren't done yet. We still have to clean them off and cut them from the sprue. No wonder brass models cost so much! Yes, this is a lot of work. But worth it. It seemed so much simpler when I visited PFM. 10. MEANWHILE, BACK AT THE RANCHSo here I am with this odd assembly of casting equipment and process cobbled together. I am now able to create custom white metal parts for my structure kits. I started off with the Ridgway Brick Office Building. Actually, it was a lesson in itself. The school of hard knocks. As it was my first experience, I learned about shrinkage the hard way. I knew there was going to be some to deal with only I underestimated and wound up having to do most of the patterns and molds all over again. It took forever! What was I getting myself into here? Overall shrinkage is not a constant either. Some things shrink more than others. Vaguely it seems to depend upon length and thickness, though the weather may have something to do with it too. There are so many variables it is hard to come up with any set rules. It is going to take me a while to figure this stuff out. Right now I guess somewhere between two and three percent overall, more on long skinny things and less on short and fat. Since I am better at figuring the shrinkage of Hydrocal it would be better to do the white metal parts first however that doesn't seem to happen as it is very difficult to wait through that long process (and expense) without beginning to work on the wall patterns. After the office building I next turned my attention onto the 100 ft. Stone Engine House. I had actually made the wall patterns many years earlier, knowing that someday I would indeed have the capacity to make the custom windows for them. With my lessons learned with the office building regarding shrinkage I was able to pull it off in one shot, however there was doubt throughout the process. All this hard work- what if I'm wrong? I had carefully measured the office building's masters and compared them to the final white metal parts. These will follow the same rules. They did, close enough. The first few projects are always the most exciting. Just as the first few sets of castings are, but then it becomes, well, sort of boring. This is really compounded on the production side of my poor white metal casting equipment. It just wasn't meant for high volume. Again, I think because I am still learning this stuff, some of my castings have very high rejection ratings. Some, I'm only getting 10-20% good parts per spin so it takes all day to get a pitiful supply. This is not good. But I plug away. I really when to town on the O-scale Wolf Creek Saloon. Unfortunately, I listened to my good friend Steve when he suggested that I do an interior scene. He just meant buy a couple of detail parts from other sources- not go crazy like I did. It sort of took on a life of its own. I started imagining what might be inside and one thing lead to another. There was a pool table, but not just a regular one, it was a big fancy "billiards" table. Then there's a bar at the back, with a fore bar, some stools and tables. There had to be a jukebox. A cigarette machine, TV. Let's see, we needed a whole bunch of bottles, all shapes, all sizes. We need Joe the bartender, and this guy Mac, an old guy who is just always there. There was this empty spot in the corner that at first I had a garbage can there, and then, hey, we've got to have a pinball machine. Before you know it, we had a deluxe kit.Not bad for my first O-scale kit. 
What a pain though. The whole process took months, from creating each one of the patterns, to RTV molds, to waxes, to brass. Then into white metal molds and finally white metal parts. One full pound's worth! Some of them are easy to cast, others are nearly impossible. Err! Good thing I am only doing 125 sets. People ask me if I am going to sell them separately. NO, I am not. I am not in the small parts business. I am in the high quality craftsman structure kits business. It is only for that reason that I do this. 11. BUILDERS IN SCALE IIIn 1984, about the same time I was starting by business, I noticed an ad for a new model kit company Builders In Scale. It was for their kit No. 1, Weiry & Sons Well Drilling & Irrigation Co., featuring white metal detail parts. While I didn't buy the kit I watched the annual ads for their next ten limited run kits along with a growing product line. I forget which convention it was that I first met the nice folks behind Builders In Scale, Jim and Jan Haggard, probably a narrow gauge convention. Before too long we became friends. I purchased some white metal castings to sell with some of my kits and visited them on several trips to Colorado. They were wonderful hosts and I enjoyed not only the cook's tour of their basement modeling empire but an insiders tour of their model railroading friends in the Denver area. At one point we were talking about collaborating on an O scale kit with me providing the Hydrocal wall castings however that never materialized. In 2002 I received a letter indicating Builders In Scale was up for sale. Jim had become involved with the new Denver Aquarium. So much so he had gone back to school with the intention of earning a PhD in marine biology and becoming a teacher. We worked out the details and BIS was moved to Washington state in 2002. The main factor that made me decide to buy BIS was the 600 or so white metal details. When you break down how much time it takes to turn one from an idea into a white metal production part it's about a day each. That's two years of pattern building and mold making, never mind all the rest, it was a great deal. 12. PIRATES! BAD BAD ONESOoh, Ooh, Ooh- Hey, I've got this great idea for a new white metal detail part. If only I can get it out of my head. Wait, I can figure this out. Okay, here's what we'll do... It depends upon the part, but I'll take some time to consider what's the best route then I'll sit down at my workbench and start building the master pattern. It can be made out of wood, metal, paper, wax, plastic- it doesn't matter if I'm going to make a rubber mold out of it. Whatever works best. If it's a simple part maybe I'll skip the mold and do it in metal, or as a burn-out-able direct investment. But if it is a complex pattern or I need duplicates I'll take the time to make an intermediate RTV mold of the part in which wax is injected, turning those into lost wax brass investment castings, which become production masters for the white metal molds, vulcanizing those molds as the final step before you are ready to cast. Each one of these steps can take hours, days, week and even months to complete. It's taken years of experience, trail and error, failed attempts, successful ones, an accumulation of knowledge, shop space, tools, time and equipment that allows me to take those thoughts out of my head and turn it into something tangible in my hand. I know each one of these parts by heart because I put my heart and soul into them. I've done a couple hundred to date. In 2002 I purchased Builders In Scale that includes about 600 detail part masters. While I do not have that direct heart to heart connection with each BIS part as I do my own I value them greatly nonetheless. I know how difficult they were for Jim Haggard to create. Some are very simple while others are amazing things. They are what makes Builders In Scale special. And now they are my things. So here's what I do not understand. Why in the world would another manufacturer risk their reputation by pirating my parts? There's just no excuse for it. I guess they think they can get away with it, that we don't care, or maybe won't notice. Sort of like shoplifting, they think one or two little items won't matter, then it's three, four... Where will it end? The problem is I cannot compete with someone who doesn't take all the steps necessary to take an idea and turn it into a part in hand. These parts do not fall from trees. Just because you do not know where the parts came from does not give you the right to reproduce them. The person making the part in the first place has the sole right to reproduce them (copyright) and recoup the cost of doing so (not just the cost of making a mold but the time, skill and expertise) plus a small (or large) profit. At least that's the way it's susposed to work. Unfortunately, some people believe otherwise. They have shamelessly taken my Builders In Scale detail parts, Fine Scale Miniature parts, and others- and made copies of them without asking the owners' permission. 
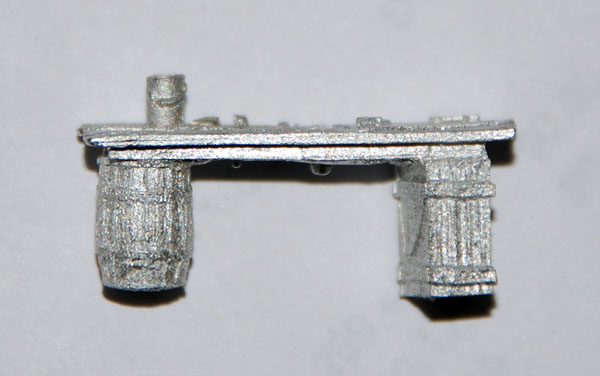
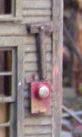
A Builders In Scale workbench knock-off, top left (we had to reverse the photo to be sure), in another manufacturer's advertisement that appeared in a recent Walthers sales bulletin. Our ligitimate workbench is pictured on the right. I discovered more pirated parts on their web page including our electric meter, welding set, anvil and more.
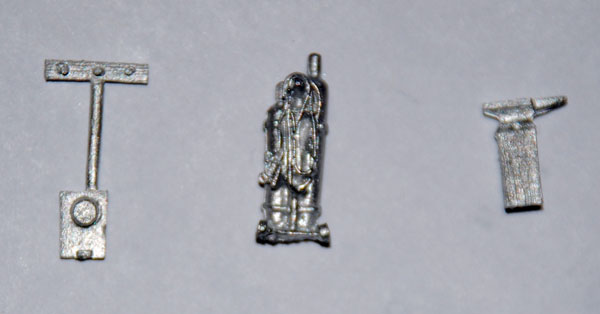
The pirated parts (below) are poorly done with excess flash and diminished detail.
They are also taking parts from George Sellios' Fine Scale Miniatures. 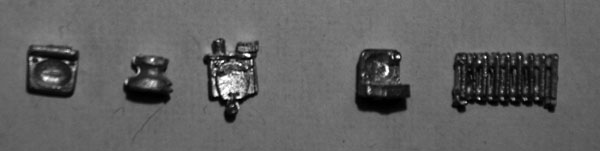
Well, I have kindly asked them to stop. I spoke to George Sellios and he explained that he is well aware of the problem here and elsewhere. Years ago he sued Fletcher and his health has suffered because of it. So he is not too excited about returning to court. Now think about that for a minute. Here's a fellow the hobby owes a great deal to. Over the years he has produced hundreds if not thousands of these fantastic detail parts we all love. He didn't take them from anyone else. He sat down at his workbench and built them one-by-one under a telescope. We need to respect that incredible contribution. It is very unique. Without it our hobby would be that much less. Not only is it wrong to make pirated parts but it is just as wrong to buy them. So please don't. Thought I am very tempted to name the manufacturer who has been ripping us off we'll give him some time to replace those parts. Six months, a year? Below is the often reproduced pirate's flag. In keeping shinny I actually drew it up myself- after looking online for some "free clip-art" but realizing I'd better practice what I preach! 
While copyright laws are complicated the idea is simple and straightforward. The moment something is written down, recorded, photographed, drawn, painted, sculpted or created the person doing so owns and controls the rights to its reproduction. It does not have to be registered, it does not have to be published, it doesn't have to have the little circle around the C marked on it. It belongs to the person who made it. So hands off! Make your own! We are selling you the castings to make a model with, we are not selling you the copyright. 13. MORE PIRATE STORIESSo in early 1984 I'm just getting into business selling my first couple of kits. I need a good name. A great one like Fine Scale Miniatures, Pacific Fast Mail, Northwest Short Line, Central Valley Model Works. Something that will be recognized, coined, easily known. But what? I made a list, I forget what all the possibilities were, dumb things like Pacific Silk Express, Northwest Silk Express... no, no, no. Blue Lake Line. No, too placid. Tripple Crown? No, too regal. Finally I settled on Puget Sound Models and registered the name with the state for tax purposes. No sooner had I paid the fee when word was passed that some guy in Kenmore, WA was selling knock-offs of PFM brass diesel truck side frames. They hadn't even bothered to scratch off the PFM logo. Funny thing was they were using the name Puget Sound Models! Our state does not care if duplicate names are registered, they don't care, they just want the tax money! Trademarks and brand names are Federally registered. At that moment I knew the name I was going to use on my models, C. C. Crow, my own. No one could mess with that. Though eople sometimes do get me confused with Crow River Products who also made Hydrocal kits. I describe another incident on the scratch building stock panel page.
And one more. This is one of those fuzzy stories that I'm not completely clear on the details so I will leave out the names. It's heresay as Jim Haggard told me this years ago and he's passed away so I cannot call him up to refresh the details. Jim had purchased the O scale white metal detail parts from a friend who was going through a nasty divorce. Somehow his ex got possession of the brass masters along with a bunch of his other model railroad items and took them to a swap meet and sold them for next to nothing just for spite. She had no right to do so as was settled in the courts. But the O scale parts Jim now owned the rights to started showing up from another source- who was unaware that they were stolen. Most of the masters were eventually returned. I guess the lesson is to ask questions and get it in writing. If the deal looks too good to be true- it probably is. Such things do not fall from trees. 14. CROW?CROW, that's my real name. The two C's are my initials. Clarence Clinton Crow. Actually I'm the third too. I go by Clint, or CC as my business name. Oh, sorry, I went off on a tangent there. We were talking about metal casting... Okay, so the reason I'm telling you all this, telling you all these secrets, exposing techniques, how to do this, how to do that, is because I like big holes in my feet. Perhaps that's true, I've shot myself several times. South River Modelworks and others have thanked me for getting them started in the business. I figure if you know the whole story- not just that you can make a mold and duplicate anything you want, any fool can do that, but if you know how the masters are built, then maybe, just maybe, you'll try it yourself and if you are really good at it then we've added something good to the hobby and I am happy to help.
|