F I N E H Y D R O C A L C A S T I N G S
B Y C. C. C R O W
P. O. B O X 1 4 2 7
M U K I L T E O, W A 9 8 2 7 5
U S A
Crow's Home
 O List Top
Crow's How 2
Order Crow's
Contact CCC
O List Top
Crow's How 2
Order Crow's
Contact CCC
|
O SCALE STRUCTURE KITS
|
|
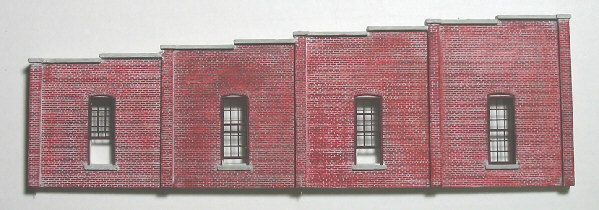
Sidewall of my S-scale pilot model |
P A T T E R N W O R K
|
The Denver & Rio Grande - DURANGO and GUNNISON Roundhouse! I am very pleased with the progress on roundhouse patterns so far. As you can see they are mostly complete (as of July 1st) and we are now ready to proceed with the molds.
Here's a close-up of the brickwork. So, how's he do that? Well, the difficult part was the twenty-some hours I spent on the original hand-scribed brick pattern (5 x 10-inch sheet). After making a mold I can cast as many as I need. The rest is simple. Cut them to the size and shape you need. Mark the door and window openings, then...
Here I'm milling out a window opening using flat-faced router bits in my drill press. Applying a few drops of tap water will soften the Hydrocal and keep the dust down. If you look close you'll see I screwed up along the left side of the cut. Guess we'll have to start over. There's no second chance.
Mill work on one of the side wall patterns. NOTE THAT THIS IS A DANGEROUS OPERATION and all care must be taken. The work is held down firmly with both hands and carefully guided into the blade.
A bungy cord holds the drill head in the down position leaving both hands free to guide the work. A sheet of (white) styrene protects the work from being scuffed-up by the table as it moves about.
The Hydrocal is quickly cut on my 9-inch bandsaw. This instantly dulls the blades so don't use your good ones. The power tools speed up the rough work however the fine work is still done by hand. A fresh no. 11 blade and a metal straight-edge is essential as is my trusty scribing tool. You'll see them in my How-2 articles elsewhere on this web site. Another indispensable tool is shown below.
I've nailed a large Bastard mill file to the edge of my workbench. The pilasters and corner details are created from brick stock that has been milled to precise thicknesses. The edges are filed clean and the mortar lines are scribed on the new surface. When the pilaster goes around a corner I decided to miter them as follows...
The corners are mitered to 45 degrees using a wood block cut to this angle.
The corners are precisely mitered. These sections of brick were milled to the required thickness.
We'll apply them to this wall next.
The mitered sections are glued onto the corners creating a nice pilaster. So how are we going to do the fancy corbels on the back wall? Almost brick by brick, I employed stripwood cut the required lengths and stacked up. We can use any material we want in the pattern. It will be cast Hydrocal in the end coming out of the mold.
Here are the corbels being added to the rear wall.
The rear wall exterior pattern is complete.
Rear wall pilasters. I'll cast those brackets in white metal.
The rear wall interior. Interior walls!! Are you kidding me?
The left side wall tall front section
The left side wall rear section
The right side wall tall front section
The right side wall rear section I've carefully matched the left and right side walls to one another so yes we can have brick detail inside and out.
Stone foundation pieces. One inch tall foundations will skirt the model. The cinder floor will be built up with two half-inch thick pieces of Homasote. And we'll insert the inspection pits. All this should be built on a good sturdy base of 3/4" cabinet grade plywood. You only need half a sheet!
These are the concrete or wood sections of the inspection pits. Its unclear if they were wood originally or concrete. It doesn't really matter as they will look almost the same once we apply black oily wet greasy to everything!
Here's the wide inspection pit assembly
Here's the narrow inspection pit assembly G U N N I S O NOne of the unique features of Gunnison is the one remaining sidewall of the original stone roundhouse which burnt down early on. My friend Glenn Farley has done the patternwork using my hand-carved stone. He did such a nice job I was inspired to do better on the brickwork.
Gunnison sidewall, exterior front section
Gunnison sidewall, exterior rear section
Gunnison sidewall, interior front section
Gunnison sidewall, interior rear section
Gunnison stonework, door opening. Why aren't the openings cut all the way through? Well, we do this for several reasons besides the simple annoyance. It adds strength to the casting during manufacture and distribution, and we often smooth the backs of our castings just after pouring. If the rubber plug came all the way up to the surface our scraping tool would bounce off of it and leave a rough spot on the casting. Ideally we want it to be completely smooth as in this cast so the interior and exterior walls will mate flush.
Auxillary pieces for Gunnison stonework
The engine door portals were originally constructed in brick and some remained so on Gunnison.
Front portal posts
There is a door opening in the Gunnison brick sidewall. This piece can be inserted into the model. Gunnison's brick sidewalls were topped with straight caps like this (Durango had the intermediate steps as we've applied). Additional straight caps will be made available. While we are on the subject the cap stones (or bricks) on Durango quickly deteriorated. In time they are repaired and patched with concrete. We've modeled the original brickwork, which can rather easily be aged and patched up. We'll include instructions in the kit.
Pattern on mold board The molds come next. Then the real fun begins, assembling this beast. I'm doing Durango and my friend Glenn is doing Gunnison. We'll try and keep you posted.
My workbench isn't usually this tidy.
Good thing we bought the new laser. The roof panels are too big for the old machine! Old-style craftsmanship with modern day tools! The roof panels are scribed with the rafter locations so construction will go fast. We'll top them off with some of my new seamed tar paper. Link to next section: Constructing the Base Link back to: Durango Roundhouse Page
|


C. C. CROW P. O. BOX 1427 MUKILTEO, WA 98275 USA